To jump straight into the “How To” without the “blabla”-intro, scroll down to section “How To – Setting Up Wireshark to do Multi-Channel / Multi-Source Captures”
Intro
While the Packet Capture functionality within the Ekahau Analyzer App is my go-to tool for Multi-Channel Captures (https://www.ekahau.com/rsc/ekahau-analyzer-packet-capture-overview/) there are 2 main scenarios in my day to day work where I have different needs and need something else:
Live / Real Time Packet Captures
Packet Capture with the Sidekick is more of a “capture now, analyze later” option, and thanks to its ease of use, even untrained people are able to do the “capture now” part. Once you stop your capture, a PCAP is created that you then transfer to your computer through the typical sharing options provided by iOS. Airdrop is the smoothest option (that is if you have a Mac), otherwise you need to choose one of the other options (OneDrive, Dropbox, Teams, Email, etc.), all of which require an internet connection that you might not always have when you are at a customer site.
When I do real time analysis or tests on site, or when I work in a lab environment, I sometimes prefer to see frames live in Wireshark, without me having to stop the capture and transfer a PCAP to my laptop.
Long Term Packet Captures
Some Wi-Fi issues are not easily reproduceable and longterm monitoring with some sort of a leave-behind sensor that can run for days or even weeks is needed. Since both iPad and Sidekick are battery powered devices, you are bound to their stamina (or your stamina/willingness to stay on site).
Options for Live Captures on Mac and Windows
Mac users have been blessed with Adrian Granados’ Airtool 2 (https://www.intuitibits.com/products/airtool2/) that tackles both issues, and can also do Multi-Channel / Multi-Source Captures.
Windows users have been left behind for a long time, but starting with Wireshark 4 got the option to install “Wifidump” and use a WLANPi as a remote sensor or OTG capture adapter. Andrew McHale wrote a great “How To” that shows how to set everything up: https://mac-wifi.com/how-to-use-wlanpi-as-a-capture-adapter-in-wireshark-4-x-on-windows/. Since I’m a primary Windows user holding the line and refusing to go “Full-Mac” (that is, fully transition to macOS like a certain Mac Deryng), this has been my go-to option for live captures, but I always believed I was limited to a Single-Channel / Single-Source Capture…
This was, until I actually read the Wifidump-Documentation (https://www.wireshark.org/docs//man-pages/wifidump.html). The first thing that caught my eye was that to my surprise, Adrian Granados is the author behind this as well. The second thing is the last section of the Documentation:
“The wifidump binary can be renamed to support multiple instances. For instance if we want wifidump to show up twice in wireshark (for instance to handle multiple profiles), we can copy wifidump to wifidump-host1 and wifidump-host2. Each binary will show up an interface name same as the executable name. Those executables not being “wifidump” will show up as “custom version” in the interface description.”
https://www.wireshark.org/docs//man-pages/wifidump.html
So I tried…
How To – Setting Up Wireshark to do Multi-Channel / Multi-Source Captures
Before you start here, please make sure you installed Wireshark with the External capture tool (extcap) “Sshdump, Ciscodump, and Wifidump”

In your Wireshark installation folder you should have an “extcap” subfolder (usually C:\Program Files\Wireshark\extcap) with the “wifidump.exe” in it. You can just copy/paste this wifidump.exe in the same subfolder (the number of copies depends on how many parallel captures you want to be able to pull – one copy per WLANPi and Channel). It doesn’t matter how you name the files.

When you then open up Wireshark, you should see a “Wi-Fi remote capture” (this is the default wifidump.exe”) and all the copies you pasted show as “Wi-Fi remote capture, custom version“:

You can now configure each of those adapters individually by clicking on the small gear icons in front of the adapter – just the way you do it for your regular Wi-Fi remote capture:


Important: If you do a Multi-Channel Capture from a single WLANPi (requires multiple Wi-Fi dongles or a WLANPi Pro with 2 Wi-Fi NICs), in the “Capture” tab you need to specify the “Remote interface” (first is wlan0, then wlan1, wlan2, etc., depending on how many Wi-Fi NICs you have plugged in to your WLANPi; if you are not sure, navigate to Network => WLAN Interfaces on your WLANPi display).
As an example:
- If you have 1 WLANPi with 4 Wi-Fi NICs, you have to configure 4 adapters individually. IP-Address, Port, Username/Password will be the same for all 4, but in the “Capture” tab, you have to differenciate the “Remote interface” to wlan0, wlan1, wlan2, wlan3, and select for each adapter the “Remote channel” and “Remote channel width” you want to capture.
After you have configured all the interfaces you want to use, the only thing left to do is select the interfaces (by pressing down CTRL + selecting the individual interfaces), and click “Start capturing packets” (the blue fin on the top left) and enjoy your “Live Multi-Channel Multi-Source Capture” in Wireshark on your Windows machine!

Additional “Gotcha”
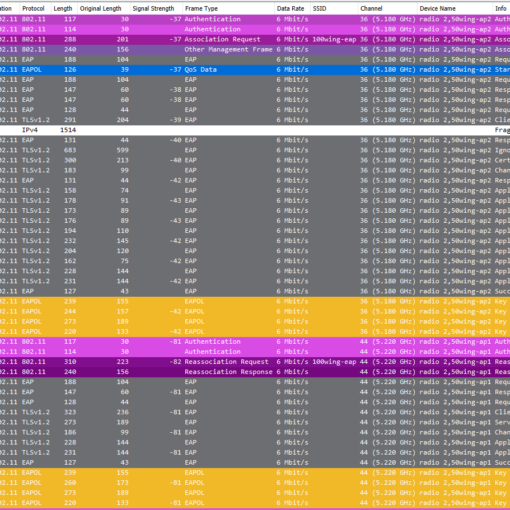
When you look at your capture, you’ll soon discover out-of-order frames, even if all the Wi-Fi NICs are plugged in to the same WLANPi:

The reason behind this is that each capture is done by an independent process (thank you Adrian Granados for the explanation!). The timestamps are set by the WLANPi, whereas the frame numbering is done by your Wireshark (FIFO)
To fix this, you can run your capturefile through “reordercap” which is part of Wireshark:

Important: If you do the captures with multiple individual WLANPis, use “reordercap” with caution. If the clocks on your WLANPis are not perfectly in sync (if you don’t use NTP), this will mess things up.